Video Tutorial followed by text+screenshot explanation. Kindly go through either of these to understand all iframe embed settings.
Video Tutorial
Below is a quite detailed video explaining steps to embed via iframe/script on your page with domain restriction, encryption, and watermark settings. Though it is a quick process there are some small things that need to be taken care of so that you don’t face any issue in playback. The video clears it with good examples, so please watch it carefully in full detail.
Text + Screenshot Tutorial on Iframe Embed (with examples of teachable, WordPress, Thinkific)
In this guide, we’ll learn about Iframe Video Embedding in Teachable, Thinkific, or any 3rd party course creator or website builder platform. Some other platforms may have some issue which in certain cases is resolvable and is explained in this tutorial at end.
Steps
- Iframe generation with all security settings. (Pre-requisite step for embed in all cases)
- Iframe Video Embed in Teachable
- Iframe Video Embed in Other platforms (explained with example of WordPress)
- Iframe Video Embed in Thinkific
Video Iframe Generation with VdoCipher
For any video that you host with VdoCipher, you have to embed it somewhere to be able to use it. This means that when you have generated the embed code for your video, you will be able to add the video to your website, blog, articles, or other website you’re looking forward to.
In order to allow embedding for a certain video, you will first need to follow the below steps which will guide you through the whole Video Embedding process.
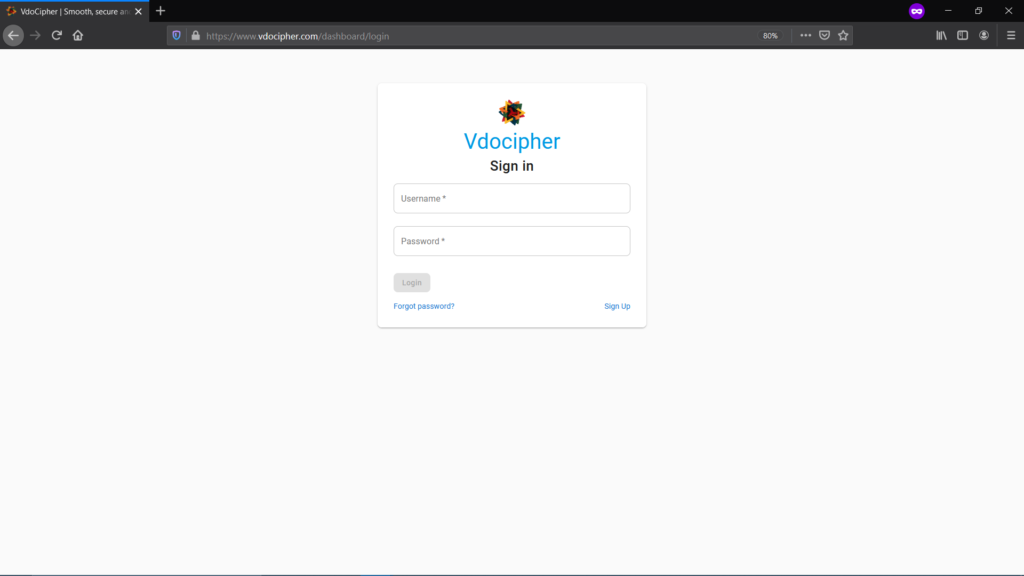
Step 1: Visit vdocipher.com and create/login your account
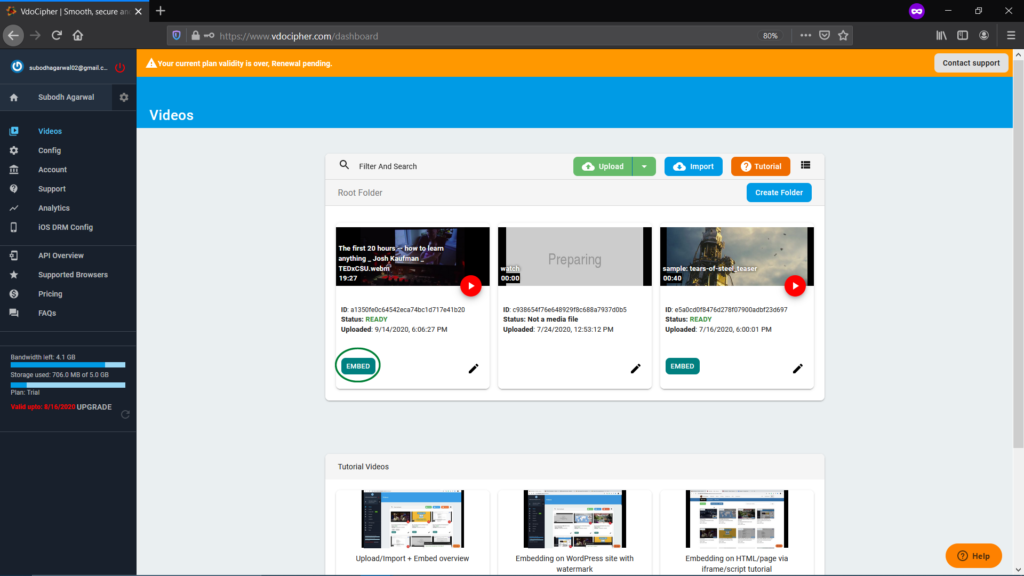
Step 2: After login, you’ll land on VdoCipher dashboard where you can see your videos. Click on the “Embed” button against the video you want to generate the Embed code for.
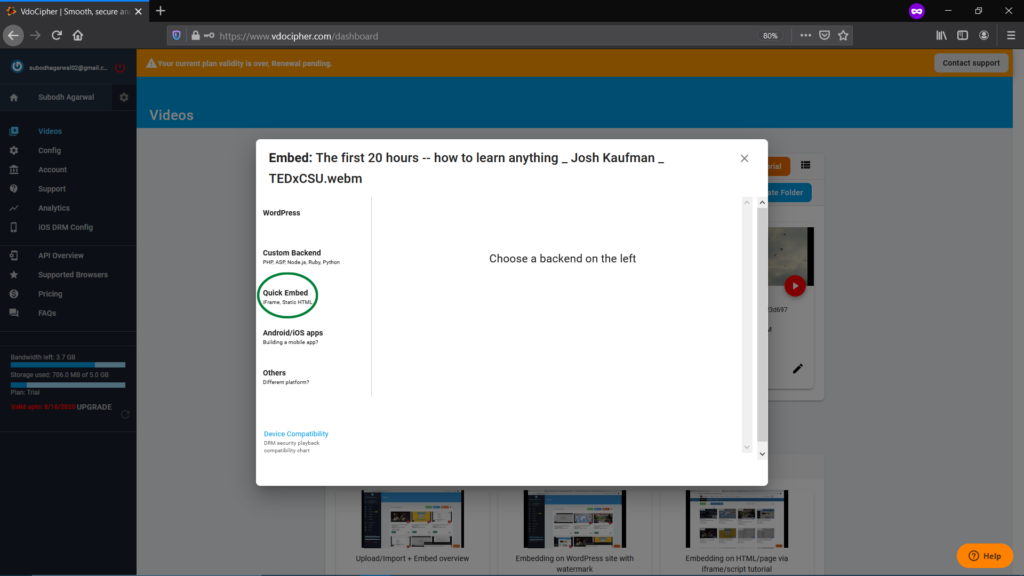
Step 3: On the Embed button Click, a popup window will appear asking you to choose your backend of your website or mobile app. For embedding via Iframe, kindly choose “Quick Embed” option. Other options are WordPress plugin or API integration or SDK integration in case that is your preferred option. “Quick Embed” option is good to embed on HTML editors , 3rd party websites like teachable etc. and is explained further here.
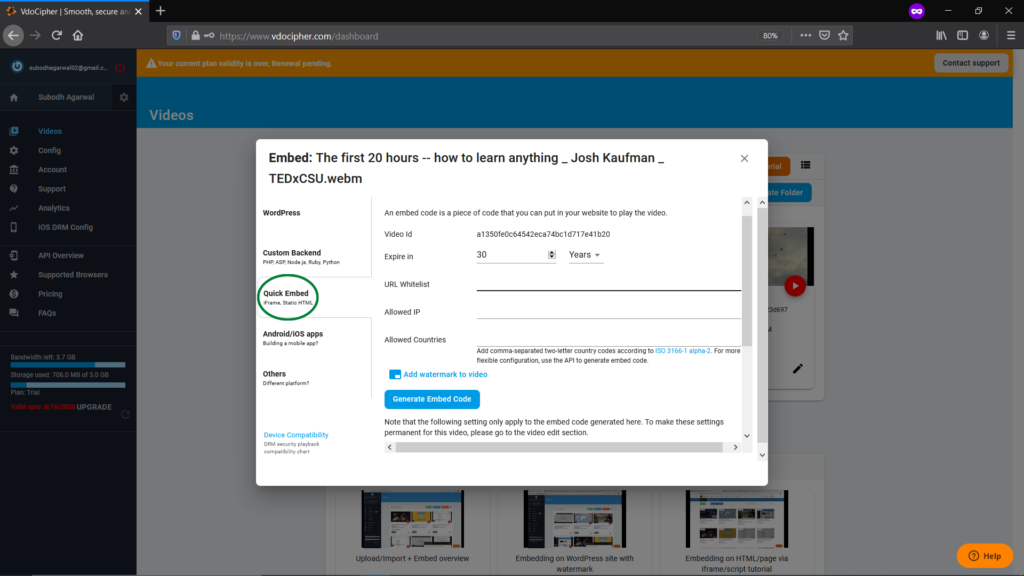
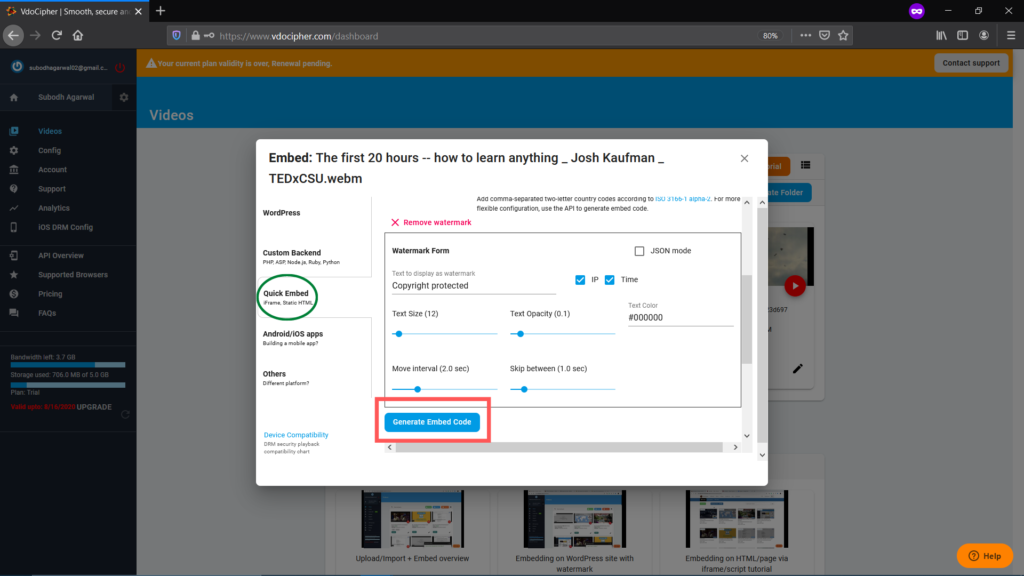
Step 4: Once you’ve selected the Quick Embed option in the previous step, you’ll have the option to edit settings of your choice few of which include Embed Expiry, IP restrictions, Watermarking, etc for generating the embed code. The below screenshot includes video settings such as:
Note – Each video can be used to generate multiple embed codes and they all can have different restriction settings.
- Expire In (Embed code Expiry): which is the duration or the tenure of the embed code you want to keep. For example, 30 years means embedded video will be available for 30 years to watch. You can reduce it as per your needs.
- URL Whitelist (Domain restriction): it should contain the url/site domain you want to play your video on such as “mysite.com”. If you want your video to play on multiple sites, just specify multiple domains separated by the | (pipe character), for instance “mysite1.com|mysite2.com|mysite3.com|” without any space. If you even want to use your subdomain to whitelist, then you can use something like mysite1.com/course.Account level domain restriction – If you want to configure domain restriction on the account level, so that you need not have to repeat for all videos, then you can do so by going to the “Config” section, and then “setting” subsection of dashboard.
Kindly note account level domain restriction is only applicable for the embed codes generated there after. Older embed codes generated before would not have this setting. Also, the video level domain restriction overrides account level domain restriction feature. So, if you want to have an embed code with different domain restriction settings as compared to account restriction, you can still do it.Note: Avoid making use of www or http/https and just mention your main domain url only. - Allowed IP: (Optional field) mention the IP address range where one wants to restrict the video like for college, office, etc.
- Allowed Countries: (Optional field) It can be left blank if you are fine with your videos playing anywhere globally. In case you want to restrict it to certain countries, here we need to mention the ISO country codes separated by commas where we want our video to run, for instance, IN, UK, USA and so on.
Account-level country settings can be done from Config” section, and then “setting” subsection of dashboard.
For account level blacklisting (instead of whitelisting), you can contact us at support@vdocipher.com.
Step 5: Dynamic Watermark (Optional)- Click on “Add watermark to video“ text from previous step for adding watermark which will then allow you to make the following settings:
- Fixed Text to Display as Watermark: Write any text here that you want to use as a watermark like “Copyright protected” or any text of your choice.
- IP/Time: You’ll see 2 check boxes for IP & Time. Just mark the checkbox for whatever you want to be visible in the video. (Note: For Time, time zone followed is GMT/UTC)
- Text Size: Once you’ve set the display text you can set the text size of your choice here by making use of seekbar provided.
- Text Opacity: You can set the text opacity if you want. It can be set from 0 to 1. The lower value you choose the lighter it will be visible.
- Text Color: For color, you need to enter the 6-digit hex code of the specific color you want to use in the video like #000000(for black) & #ffffff(for white).
- Move Interval: If you want your watermark to keep moving or changing its positions you can use this setting. Lower the value, faster will the watermark move. Set it as per your convenience by making use of seekbar.
- Skip Between: Set the time frame where you want to skip the watermark between the video.
Once all the settings are done you can just click on “Generate Embed Code” Button which will then generate the Embed code for you.
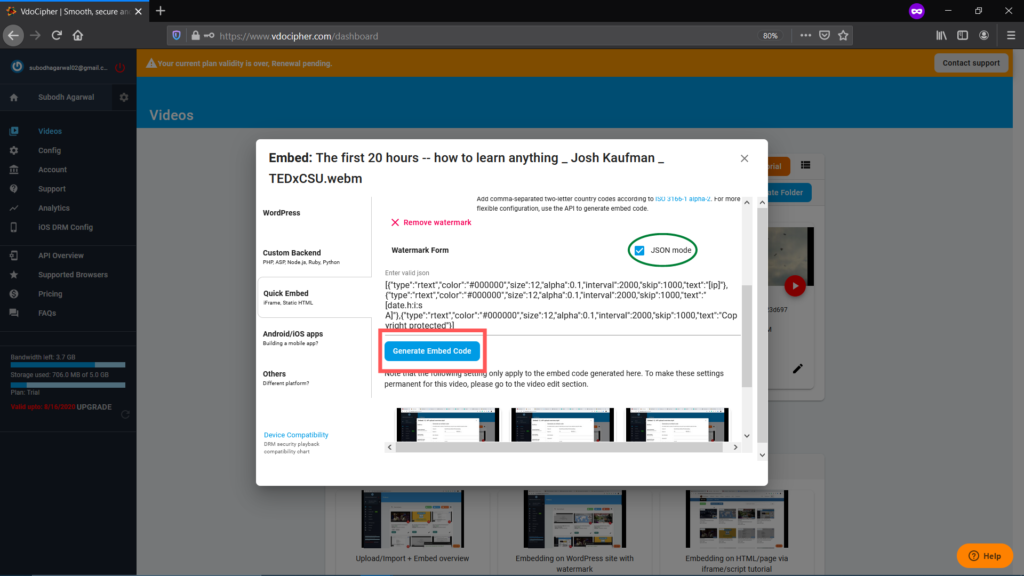
Further, if you want more customization in the watermark, just mark the JSON mode checkbox and a JSON string will appear wherein you can make more customization.
JSON advantage of copy pasting watermark settings – JSON also has an extra advantage, that this code can be copied and pasted into any other video embed watermark settings. Thus, you need not configure watermark code for every video again, you just copy this JSON code once set for one video and then paste it in any other video’s watermark setting.
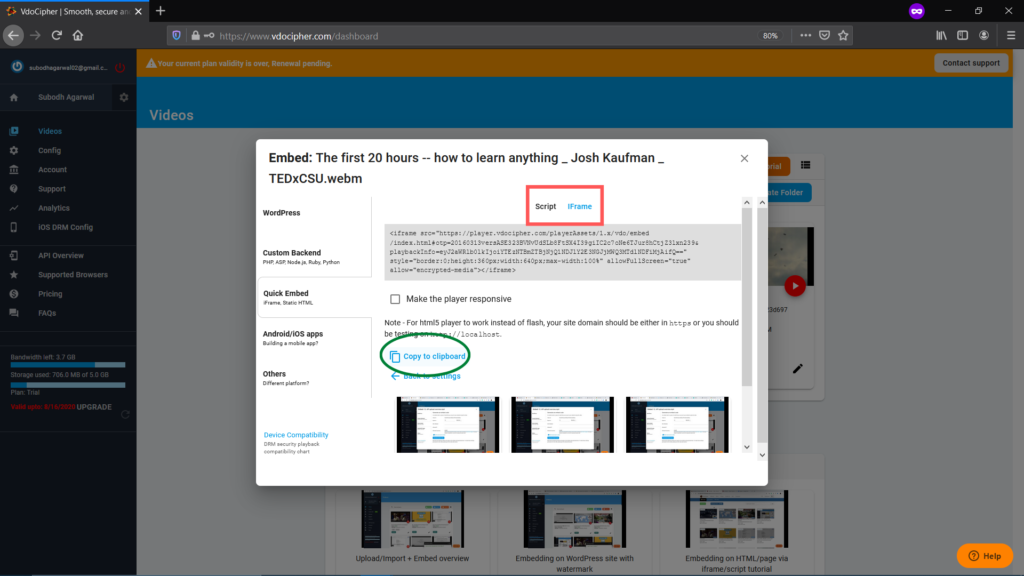
Step 6: Once you’ve made all the settings and generated the embed code, you’ll get the “Copy to clipboard” option. You can just click on it and the entire code will be copied for you. The code is available in 2 formats i.e. via iFrame & Script. You can choose any as per your need. In most cases Iframe works better, in some cases script might also work.
Sample Iframe
“
<iframe src=”https://player.vdocipher.com/v2/?otp=20160313versIND313AMlFYwHZm80vw6MLcSo64oDQMqPMNYh3L8w22zEEWjw5Bj&playbackInfo=eyJ2aWRlb0lkIjoiMDk4NDhkM2JkMTIyNDAwZTlmNWMyNTliOTE1OGQ1ODMifQ==” style=”border:0;height:360px;width:640px;max-width:100%” allowFullScreen=”true” allow=”encrypted-media”></iframe>
”
Being careful about iframe embed and a common issue
There is a highlighted bold portion in above sample iframe. This is something most other providers like Youtube , Vimeo do not provide as their content is not encrypted. While most platforms like Teachable embed and publish our iframe as it is without any distortion, some platforms’ editor removes this highlighted part from published iframe causing some issues. It is explained further below in detail.
Video Embed on Teachable
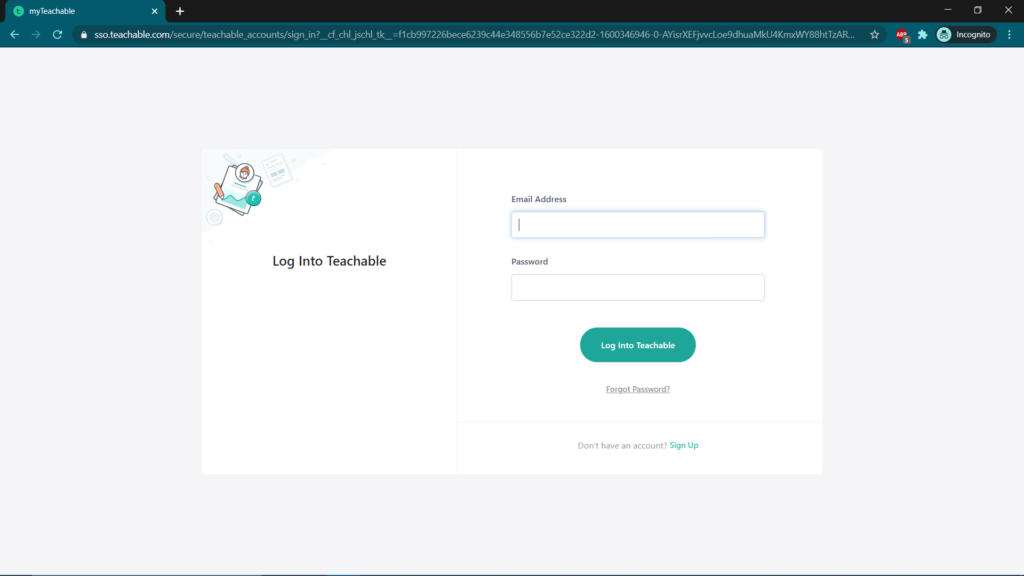
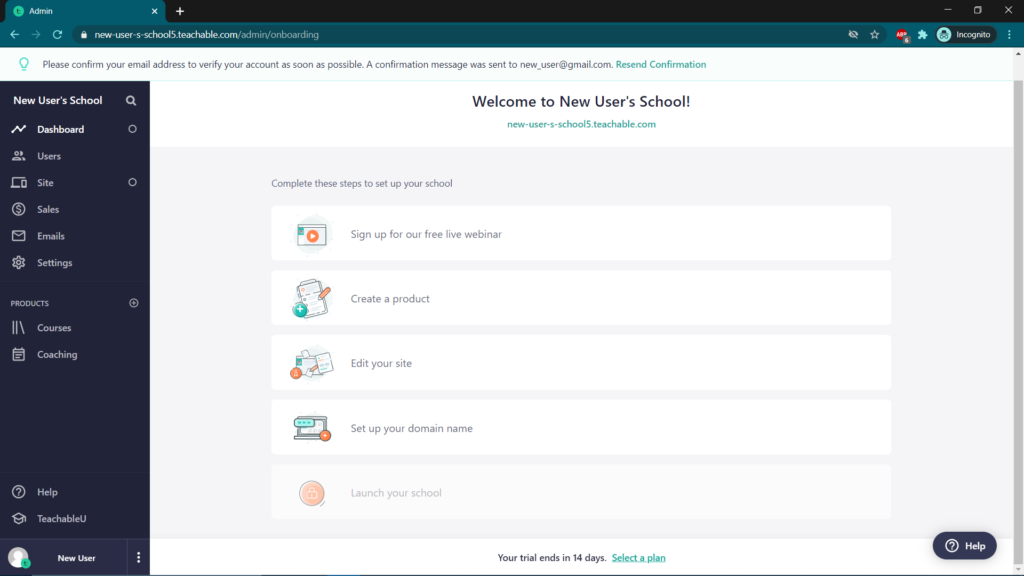
- Step1: Visit teachable.com and create/login your account
- Step 2: Once done, you’ll land on the Teachable dashboard.
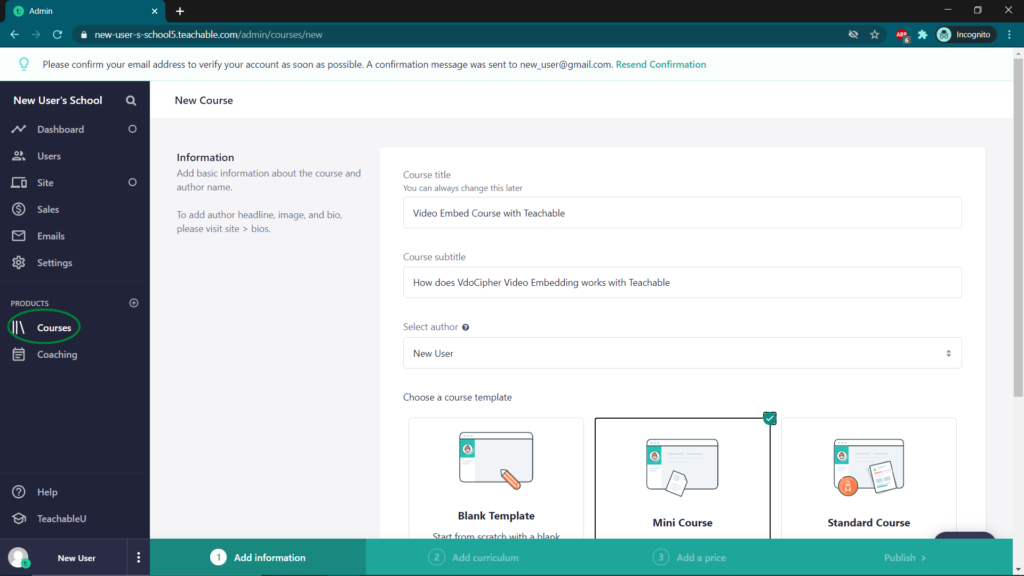
- Step 3: Select Courses from the left panel on the Dashboard and start creating your course.
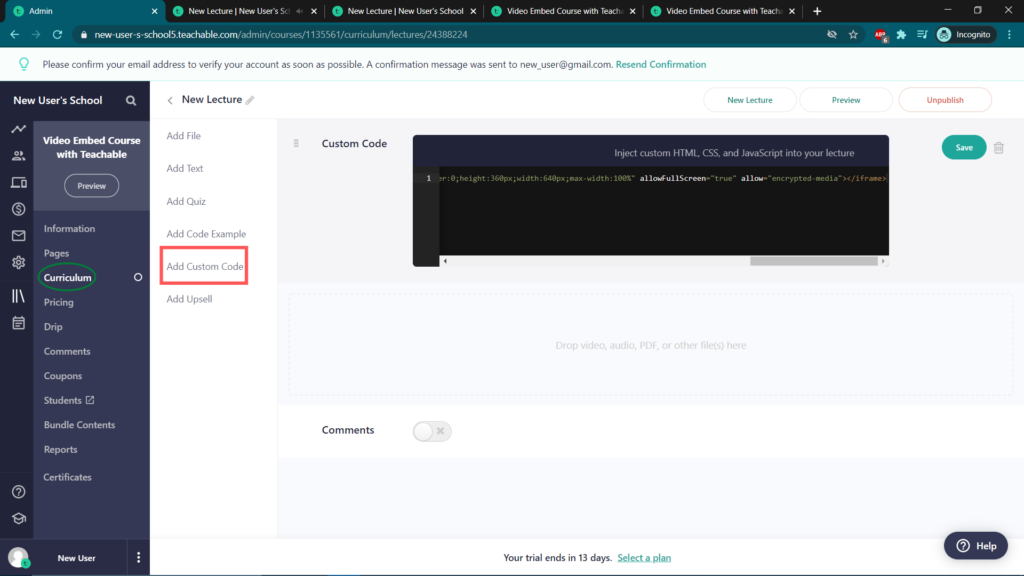
- Step 4: Visit Curriculum, create a new lecture and paste your code under the “Add Custom Code” section and click save and publish your course.
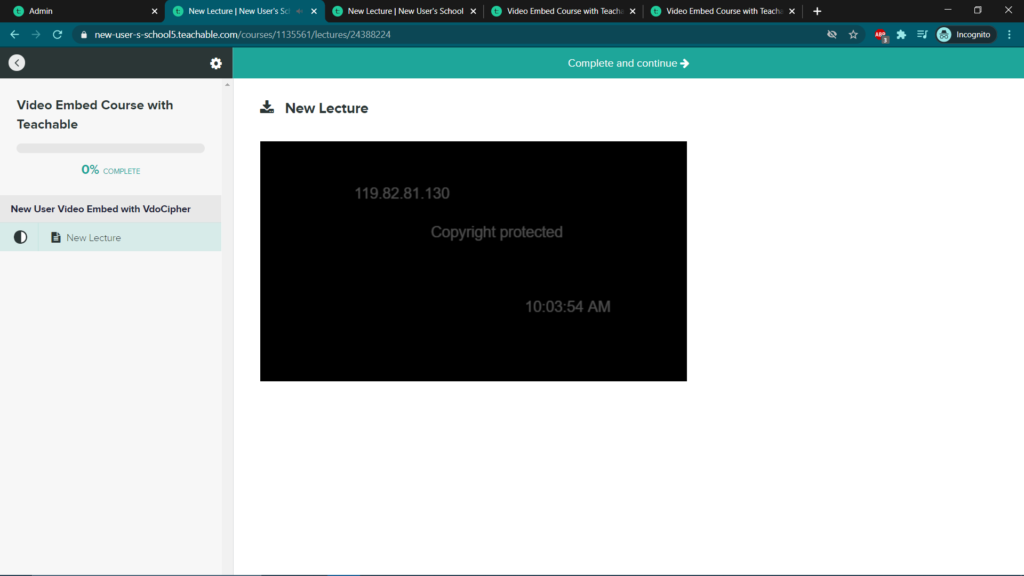
- Step 5: View your lesson and you’ll see your embedded video with the settings of your choice.
Embedding Video on Any HTML editor (explained with the example of WordPress)
Best way to embed on WordPress is WordPress Plugin + Shortcode , and not iframe. But for certain cases you might want to use iframe embed even in WordPress. Also, many editors work similar to WordPress editor, thus similar things can work on other platforms.
If you’ve got a blog or website that’s on WordPress, here’s the way to embed a video. Once you have generated your embed code, login into your WordPress account and open your post via “Classic Editor” which is highly used and recommended as some other editors might create some unwanted issues.
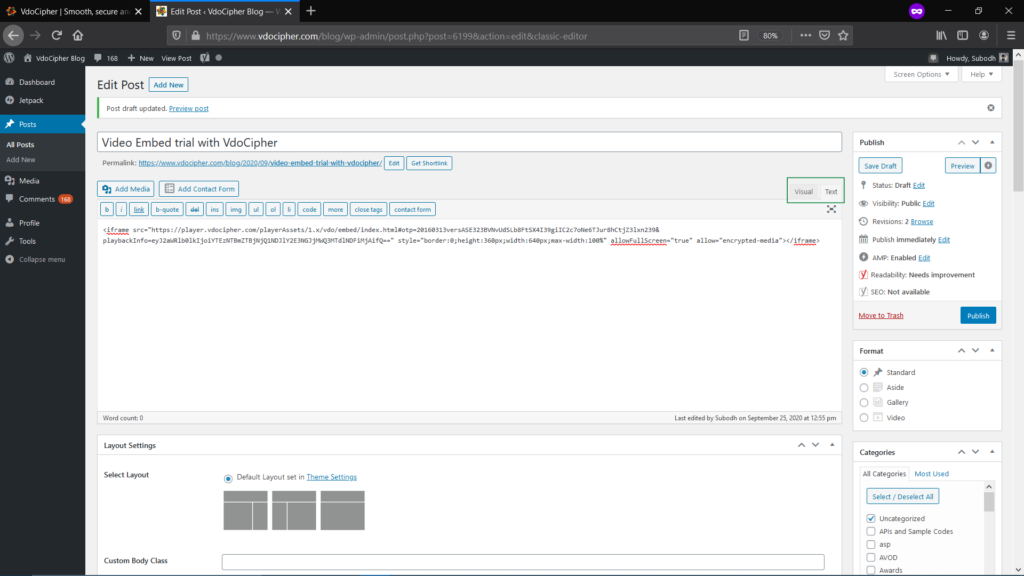
Step 1: In the below screenshot, as you can see we have placed the generated embed code under the text section instead of visual section. Always make sure to do it this way as doing it via visual section may sometimes ask you to install some flash player and stuff. Hence it is recommended that you follow this approach only.
Step 2: Once you’ve placed your code under the text section as shown in the previous step, you can preview or check your draft of post to ensure that the embedded video is playing fine.
Video embed on Thinkific and a common issue correction
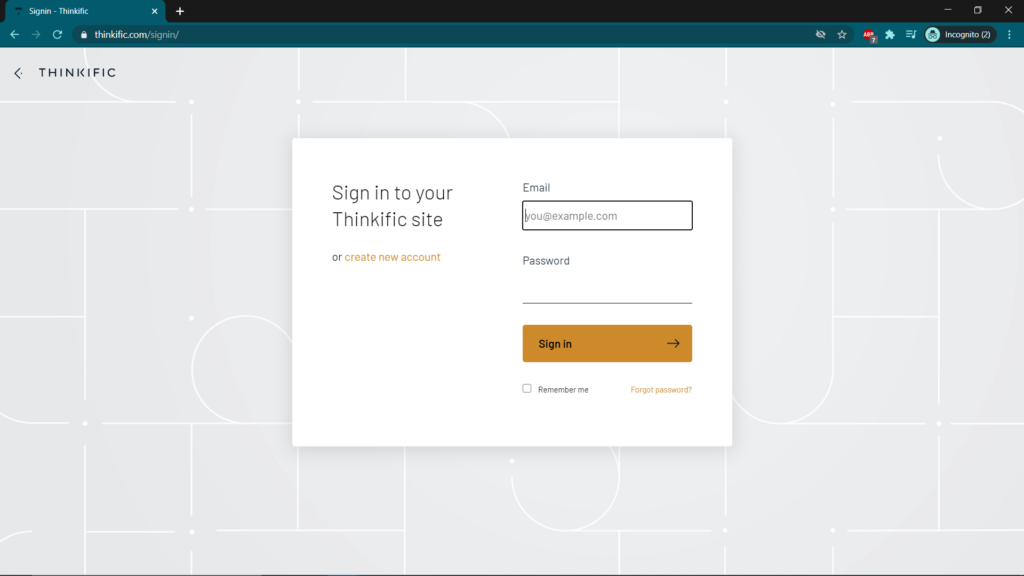
- Step 1: Visit thinkific.com and create/login your account
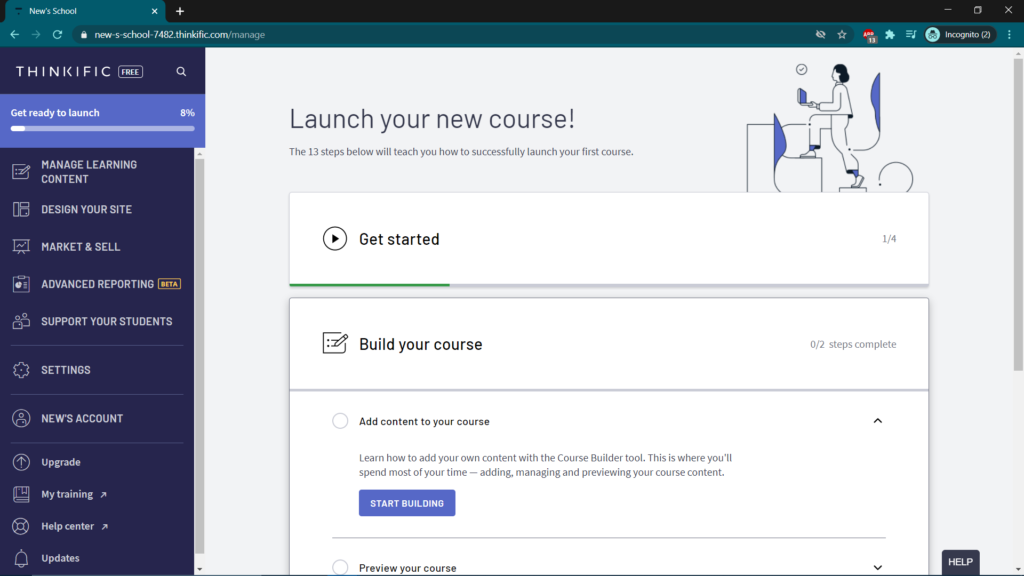
- Step 2: Once done, you’ll land on the dashboard, click on the start Building button for creating your course.
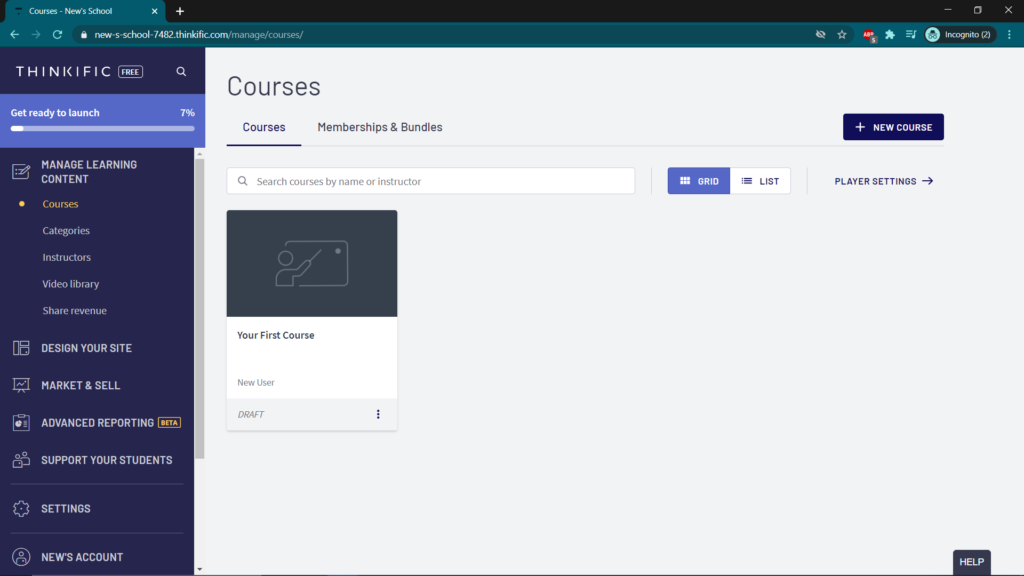
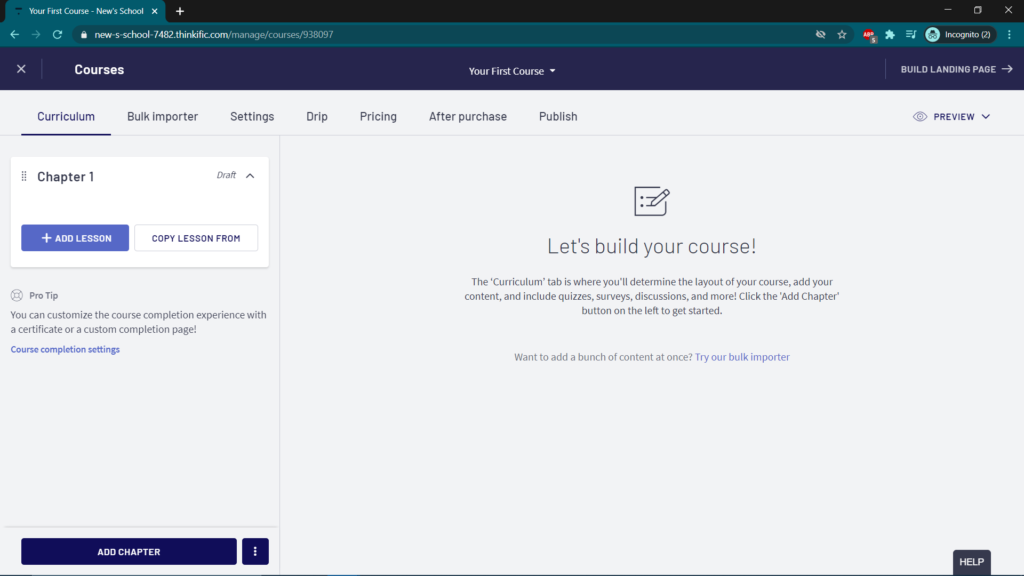
- Step 3: Click on your course and inside it start creating a new lesson.
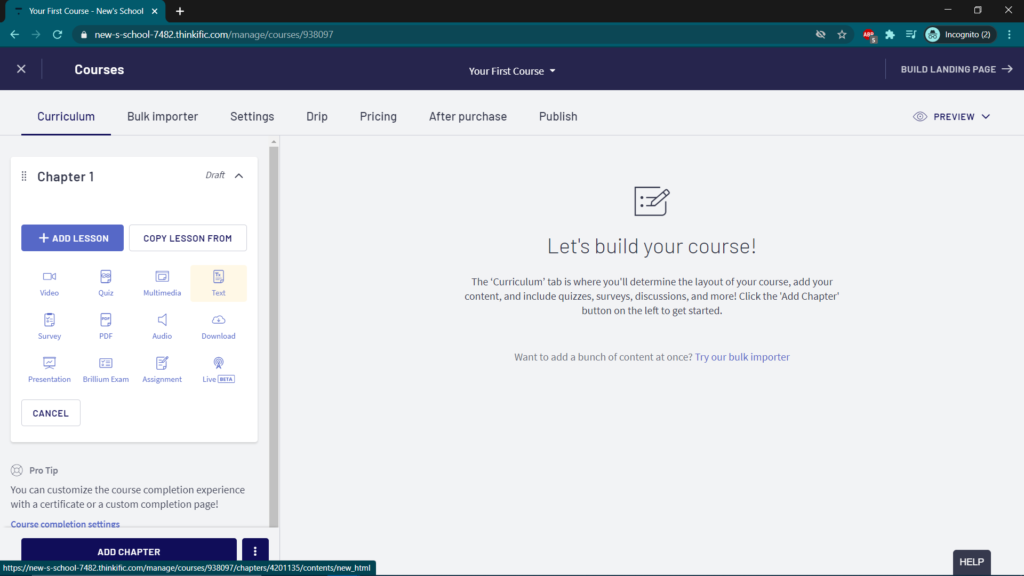
- Step 4: Click on “Add Lesson” button for getting started.
- Step 5: Choose text type from the given menu which appears after clicking on “Add Lesson”.
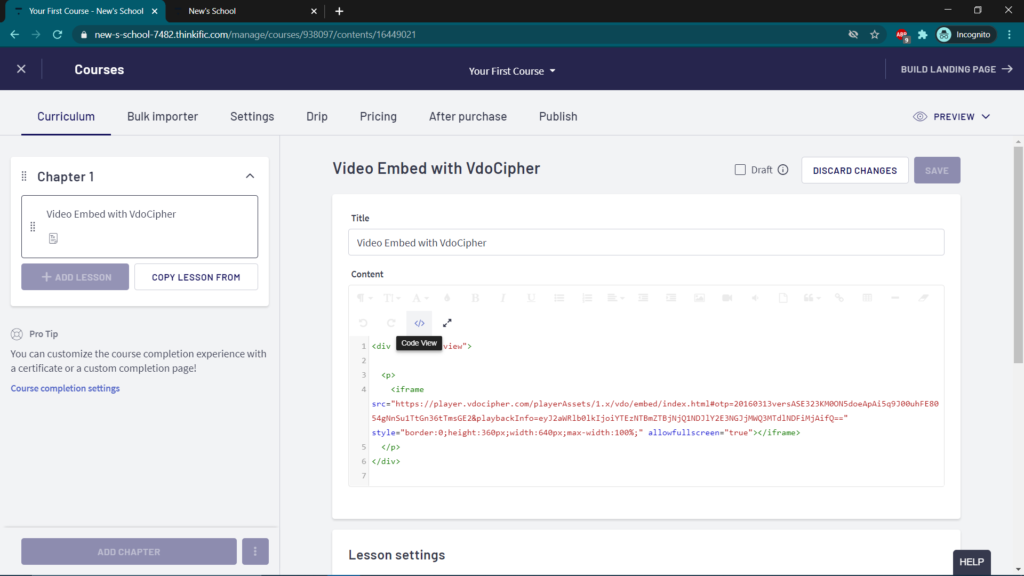
- Step 6: Click on the code view option in the editor on the right side and paste your code.
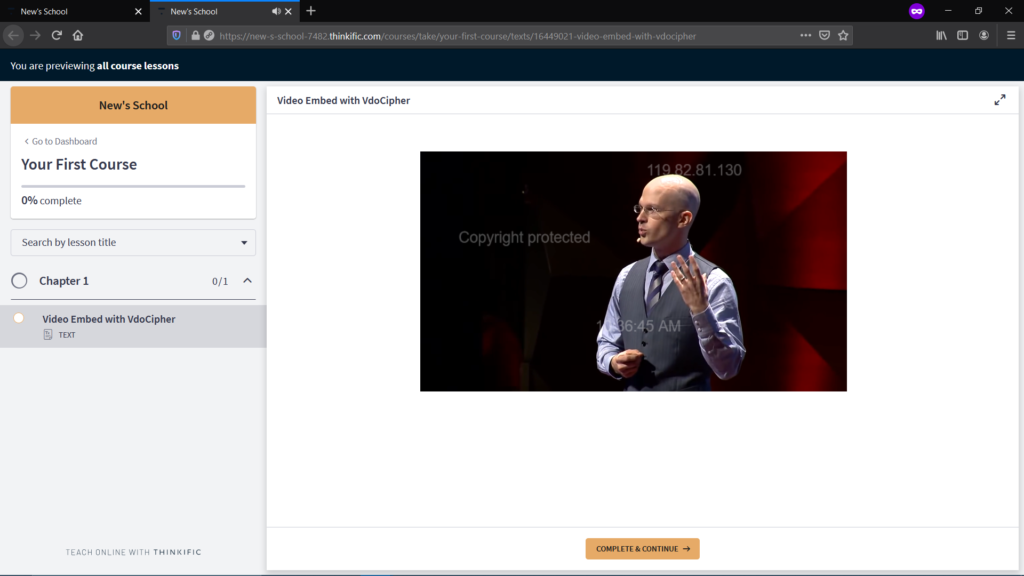
- Step 7(a): Preview in Firefox
- Step 7: After placing the code, just click on save button and preview your code from the top right corner. You will have your video embedded along with the settings that you’ve chosen.
Reason for error in Iframe with any platform
Sample Iframe
“
<iframe src=”https://player.vdocipher.com/v2/?otp=20160313versIND313AMlFYwHZm80vw6MLcSo64oDQMqPMNYh3L8w22zEEWjw5Bj&playbackInfo=eyJ2aWRlb0lkIjoiMDk4NDhkM2JkMTIyNDAwZTlmNWMyNTliOTE1OGQ1ODMifQ==” style=”border:0;height:360px;width:640px;max-width:100%” allowFullScreen=”true” allow=”encrypted-media”></iframe>
”
There is a highlighted bold portion in above sample iframe. While most platforms like Teachable embed and publish our iframe as it is without any distortion, some platforms might remove this highlighted part from published iframe causing some issues.
We hope by now you must be clear with the Iframe Video Embedding process with VdoCipher and how it actually works. If you’ve tried using the instructions in this article and are still having trouble embedding a video on your website, please reach out to us on support@vdocipher.com. Different websites are set up differently, so you may need to do something special for your specific situation.
Supercharge Your Business with Videos
At VdoCipher we maintain the strongest content protection for videos. We also deliver the best viewer experience with brand friendly customisations. We'd love to hear from you, and help boost your video streaming business.

