At VdoCipher we are committed to building the best platform for hosting premium content. While our security features ensure that our secure video hosting beats all competition, we have also made our platform intuitive and easy to use.
Here you can find our tutorial videos on upload/import and various other features in detail.
Detailed tutorial videos are included below –
Dashboard features & video setting details
- Multi-User addition to account & permission levels
- Adding more accounts/projects to same dashboard
- Get all videos data in csv (title, id, status, time added)
- Generating video page url to share directly to user (not embedding)
- Video settings overview (Thumbnail, title, tags, subtitles, replace video)
- Thumbnail & title change: Tutorial
- Subtitle addition (Multiple Language supported)
- Replace/Swap/Update Videos
- Video Files & Thumbnails Generated data & total storage for a video
- Api key generation (Client Secret key for your account)
- Webhooks to fetch video status via API
We have developed several features as part of our dashboard and as part of our API so that users can manage their videos. This blog covers all stages of a video-based workflow, from uploading video to using advanced analytics to assess video performance.
Table Of Content:
Upload

It is vital for our users the the time between video upload and when video being ready is minimized. Optimizing the time to encode and encrypt videos is an engineering challenge that remains top priority for our developer team.
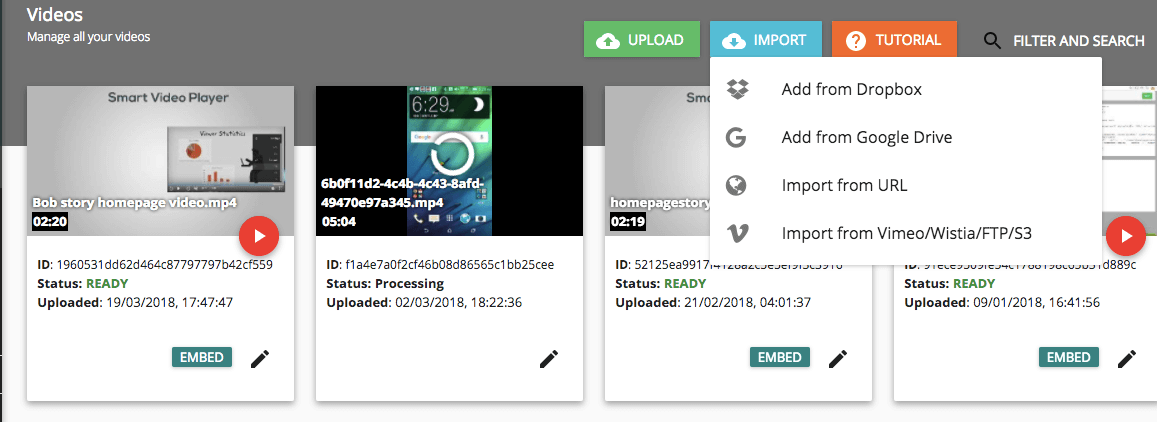
The green Upload button can be used to directly upload videos from your device. You may alternatively import videos from URLs of MP4 or FLV files, from either HTTP or FTP.You can also import video files frmo Cloud Service Providers such as Dropbox and Google Drive, and from video service providers Wistia and Vimeo. If you require to bulk import videos from other sources please communicate to us at support@vdocipher.com.
Directly importing videos from URLs saves your device’s bandwidth usage and allows video file transfers to happen completely behind the scenes. There is a progress bar that shows the relative completeness of upload process. Once the video is uploaded, it shows in dashboard with any of the following status, which reflects the status of the video upload process:
| Video Status | Meaning |
| Queued | Video uploaded successfully, soon to start encoding |
| Processing | Video being converted to encrypted formats for dekstop & mobile |
| Ready | Video is ready to be embedded onto site |
You can check the video status by making an API call as well. If the video you uploaded is in Queued status for a long time, drop us a message at site chat or support@vdocipher.com, Generally a 15 min video should be encoded in 20 minutes time and be ready for release. However if you have uploaded multiple videos at once – say 50 or more then video upload may take more time.
Many of our enterprise customers have their customers or partners actually providing videos to them. In such cases, it becomes quite useful if the video transferred by them to your website or app directly reaches your account on Vdocipher. VdoCipher enables this functionality through upload APIs. To automate your upload process you can visit the following blog on Video Upload Using API.
We have optimized our encoding configurations to generate best quality videos at lowest bitrates. If you have any particular request with regard to resolution/ bitrates please let us know at support@vdocipher.com.
Integration into site or app
There are mainly three means of integrating VdoCipher to your website:
- Plugins – WordPress, Joomla!, Moodle, Drupal
- Player Embed Code with Dynamic OTP Generation
- Quick Embed via iFrame
To see the embed options videos please click on the Embed button for the respective video in the Dashboard.
Plugins – WordPress, Joomla!, Moodle, Drupal
The simplest way to embed secure videos through your CMS-based website is by using our plugin. The plugins for WordPress, Joomla!, Moodle and Drupal generate dynamic OTPs in the backend and send them to the front-end. The OTP generation and authentication happens completely under the hood of the plugin, and to embed the video you only require to add a shortcode, having the following format:
[vdo id= '1234567890']
Please visit Protect Videos on WordPress for more details on using our WordPress plugin. While WordPress remains the most popular Content Management System, our plugins for Joomla!, Moodle and Drupal continue to be very popular with content creators looking to protect their premium videos. Plugins for Joomla!, Moodle and Drupal have the same means of embedding video through the shortcode.
The following blogs give details on using VdoCipher plugin for the respective CMS:
- Protect Videos on WordPress
- VdoCipher plugin on WordPress directory
- Moodle Video Embed and Upload Solution
- Secure Videos in Joomla with VdoCipher plugin
- VdoCipher Joomla Extension
Player Embed Code with OTP Generation at Backend
VdoCipher’s secure video streaming requires backend authentication via unique tokens. For this your site backend has to make an HTTP request to VdoCipher API, which returns an OTP to authenticate playback session. This OTP is to be then appended to the player embed code on the site front-end.
The embed code would require the API Secret Key (also called API Key), which you can get from the Config section of the Dashboard.
Please note that the OTP call should always be made from the site backend (controller in MVC architecture). The received OTP (and playbackInfo) are then appended to the player embed code in the frontend (view in MVC architecture). This division across site backend and frontend is critical for ensuring maximum security. We have deliberately blocked OTP requests from site front-end, as this would expose your API Secret key to site visitors.
You can consult the following resources for website integration in different web scripting langugages
- VdoCipher API Page
- Protect Videos using Watermark
- Sample VdoCipher API Implementation for PHP
- Sample VdoCipher API Implementation for ASP.NET
- Sample VdoCipher API Implementation for Node.js
Quick Embed via iFrame
The Quick Embed option via iFrame is the fastest way to embed videos to your site. This is the best option when you are using ready-made website builder platforms such as Wix, Weebly or Squarespace. The following blog provides details on VdoCipher integration with ready-to-build site platforms
The quick embed code can be customized, with three features:
- You can set the embed code to expire for a period of time. By default the embed code expiry is set to 30 years.
- IP and Geo – You can limit access to certain IP addresses and to certain geographical locations only.
- URL Whitelisting – Video will play only if the video player is embedded to the main website. This ensures that piracy through URL sharing is avoided
Note that public embed code & URL whitelisting are less secure than integration through APIs or plugins. Also watermarking is not possible in that case. However even then the stream is fully encrypted and therefore piracy is still prevented from downloaders. Overall our security offerings are much more complete than our competition.
Please make sure that you only embed videos after you have edited all the required settings. We highly recommend that you opt for security through plugin or API, but if not possible we have simplified the process of Public embed code and URL whitelisting option.
Video detail management
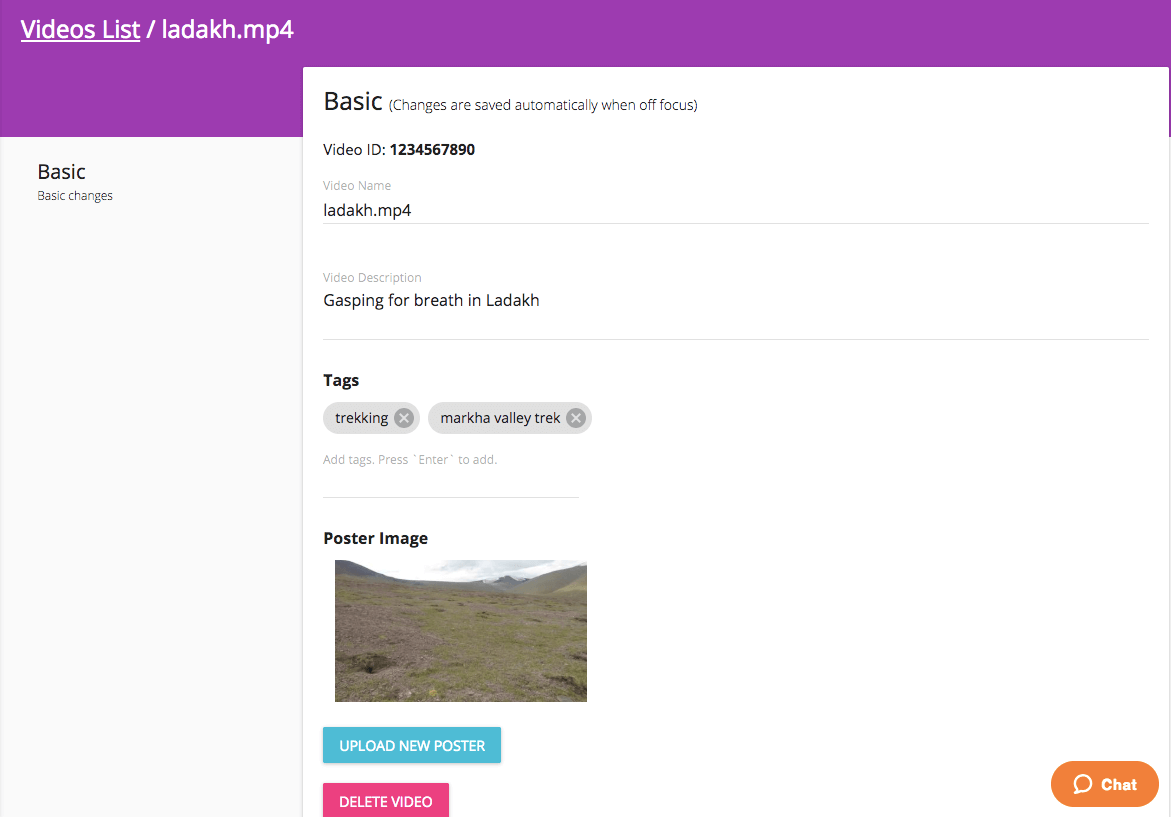
You can manage video details, including title, description, tags, poster image and subtitles by clicking the Edit button for each video.

Add Tags
We have enabled a tag-based video management system, which makes it easier for users to categorize and manage their videos. You can easily add/ remove tags from the Edit menu.
Alternatively you may use the tagging API to update tags in your videos.
Thumbnail
By default, a random frame in the video is set as thumbnail. You can customize the poster image to capture your viewer’s attention and enhance click-through rates for your video. To set any other image, you can upload the image in the Edit section.
You may alternatively use the Poster image API to upload the new poster image.
Add captions to Videos
You can upload subtitles for any language that is part of the ISO 639-1 system, as a VTT file. Subtitles are really useful to reach out to newer audiences, as well as to help native speakers follow the video content better.
Filter and Search
Specific videos can be searched using ID, Title or associated tags using the Filter and Search option available in the dashboard. The complete details (id, title, status) of all videos can be downloaded at one go by selecting the Download CSV option.
You can alternatively use the Search API to search for videos based on tags, video ID or title.
Analytics – Usage details
You can see your account bandwidth and storage usage on a daily basis in the Analytics section of the Dashboard.
This data is received from CDN endpoints that accurately reflect the daily bandwidth usage. You can export this bandwidth data as a .csv file for any date range.
We also provide advanced video analytics about how viewers watch your videos. These analytics collect anonymized information about the most popular videos on your platform. These analytics are designed to provide you information about the relative performance of your videos, so you can see how best to improve your library of video content.
Please note that the measurement of video analytics is different from measurement of bandwidth usage, and may not track 100% of user sessions.
Testing for Secure Streaming
Once your video is ready you test secure video playback on any device. You can log into the Dashboard and simply click the play button to start video playback. You are welcome to test out downloader plugins or any hack your best developer can think of to try and download our videos.
Normally our video encoding settings have been optimized to stream highest quality videos at lowest possible bitrates. Indeed we often delight our users by streaming HD videos at 400kbps bitrates.
However if you find any issues with video streaming, it may be for either of the following reasons:
- For the first time of playback, the video is not cached in nearest CDN servers, and the streaming is therefore a little slow. Once video is cached to the server, after second playback video quality and streaming improves quite a lot.
- It is possible that the available video bitrates are high when compared to your network connections. While adaptive streaming ensures that the best resolution is displayed for user’s network conditions, in such a case you may require custom encoding settings. Please communicate your issue to us at support@vdocipher.com, and we’ll ensure that optimized encoding settings are applied for your videos.
We have implemented many optimizations in our encoding settings to ensure the best user experience. These optimizations have enabled our customers to reach users across the world, including in corners of India and the African continent where internet connectivity is comparatively poor.
– Blogs & Site chat – There is lot of documentation on how to use, and what are the benefits and standards for various technologies at our blog. (vdocipher.com/blog), Search the blog for your required keyword to see related articles.
We ensure availability of our support team at the live site chat (bottom right of the vdocipher site). Please feel free to ping us to have a detailed conversation. Our support team would help you through most of your queries and problems.
For a full version 5 GB free trial of vdocipher secure video hosting & streaming , register at www.vdocipher.com
Supercharge Your Business with Videos
At VdoCipher we maintain the strongest content protection for videos. We also deliver the best viewer experience with brand friendly customisations. We'd love to hear from you, and help boost your video streaming business.


Leave a Reply